

Ever scrolled through Instagram, mesmerized by flawless faces, only to feel a pang of intimidation when you look at your own makeup bag? You’re not alone. For many of us, the world of makeup can feel like a secret society with its own complex language of primers, concealers, contouring, and baking. It’s easy to get overwhelmed by the sheer volume of products, the dizzying array of tutorials, and the pressure to achieve a “perfect” look.
But here’s the honest truth: makeup isn’t about perfection. It’s about play, self-expression, and enhancing what you already have. And the good news is, learning how to apply makeup for beginners step by step doesn’t have to be daunting. Think of me as your personal beauty guide, here to demystify the process and equip you with the fundamental skills to create a natural, radiant look you’ll love. We’re going to break it down, make it simple, and empower you to confidently navigate your beauty routine. No complicated techniques, no intimidating jargon – just real, actionable advice from your smart best friend.
Ready to unlock your inner artist and embrace the joy of makeup? Let’s dive in!
Building Your Beginner Makeup Kit: The Essentials You Actually Need
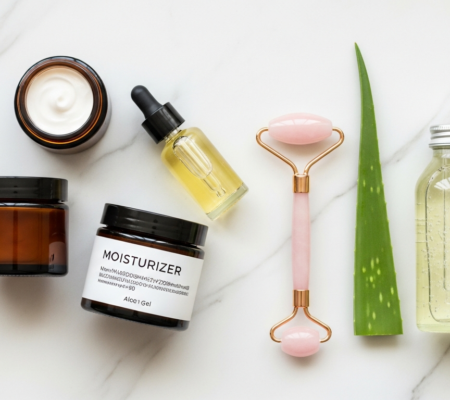
Before we even touch a brush, let’s talk about what you need. The beauty industry wants you to think you need everything, but for a beginner, a curated collection of versatile essentials is key. Focus on quality over quantity, and choose products that suit your skin type and tone. Here’s a streamlined list to get you started:
- Skin Prep:
- Gentle Cleanser: To start with a fresh face.
- Moisturizer (with SPF!): Non-negotiable for healthy skin and a smooth canvas.
- Primer (optional but recommended): Helps makeup last longer and creates an even surface.
- Base:
- Foundation or Tinted Moisturizer/BB Cream: Choose one that matches your skin tone perfectly and offers the coverage level you desire (start sheer!).
- Concealer: A shade slightly lighter than your foundation for under-eye brightening, or one that matches your skin for blemishes.
- Setting Powder (translucent or skin-toned): To set your liquid products and reduce shine.
- Cheeks:
- Blush: A flattering shade (cream or powder) to add a healthy flush.
- Bronzer (optional): For warmth and subtle definition.
- Highlighter (optional): For a radiant glow on high points of the face.
- Eyes:
- Brow Product: Pencil, powder, or gel to define your brows.
- Neutral Eyeshadow Palette: Think browns, taupes, and creams – versatile for everyday looks.
- Mascara: Black or brown to open up your eyes.
- Eyeliner (optional): Pencil or gel for easy application.
- Lips:
- Lip Balm: For hydration.
- Lipstick or Lip Gloss: Choose a few shades you love (nude, berry, soft pink).
- Tools:
- Beauty Sponge or Foundation Brush: For seamless base application.
- Blush Brush: Fluffy and soft.
- Eyeshadow Brushes: At least one fluffy blending brush and one flat shader brush.
- Clean Fingers: Seriously, some products apply best with your fingertips!
Pro Tip: Don’t buy everything at once! Start with a foundation, concealer, mascara, and a lip product. You can gradually build your collection as you get more comfortable.
Prepping Your Canvas: Skincare First, Always!
Think of your skin as the canvas for your masterpiece. Just like an artist wouldn’t paint on a dirty, uneven surface, your makeup will look its best on well-prepped skin. This step is non-negotiable for a smooth, long-lasting application and healthy skin.
- Cleanse: Start with a clean face. Use a gentle cleanser to remove any dirt, oil, or residual skincare products. Pat your face dry with a clean towel.
- Moisturize: This is crucial! Apply your favorite moisturizer. If it contains SPF, even better! Hydrated skin is plump, smooth, and prevents makeup from settling into fine lines or clinging to dry patches. Give your moisturizer a minute or two to fully absorb before moving on.
- Prime (Optional but Recommended): A primer acts as a barrier between your skin and your makeup, creating an even surface and helping your makeup last longer.
- How to apply: Take a pea-sized amount and gently massage it onto your face with your fingertips, focusing on areas where you tend to get oily or where pores are visible (often the T-zone). Wait another minute for it to set.
- Types of primer: There are hydrating primers, mattifying primers, pore-filling primers, and color-correcting primers. For beginners, a simple hydrating or smoothing primer is a great start.
Remember: Great makeup starts with great skin. Don’t ever skip your skincare routine!
Step 1: The Base – Foundation, Concealer, and Setting the Stage
This is where we create an even, radiant foundation for your entire look. The goal isn’t to mask your skin, but to unify your complexion and create a smooth canvas.
Finding Your Perfect Match: Foundation/BB Cream
The biggest challenge for beginners is often finding the right shade and formula. Go for a product that offers light to medium coverage initially – something that lets your natural skin peek through. You want it to look like your skin, but better.
- Choosing your shade: Test shades on your jawline, not your hand. The correct shade should disappear into your skin without leaving a noticeable line. Look at it in natural light if possible!
- Choosing your formula:
- Tinted Moisturizer/BB Cream: Sheer coverage, very natural, great for dry skin.
- Liquid Foundation: Most versatile, comes in various finishes (dewy, satin, matte) and coverage levels.
- Stick Foundation: Creamy, often good for on-the-go touch-ups, can be medium to full coverage.
- How to apply:
- Dispense a small amount onto the back of your hand.
- For a beauty sponge: Dampen the sponge until it’s soft and expanded, then squeeze out excess water. Dab the sponge into the product and gently bounce it all over your face, starting from the center and blending outwards. Use a light, patting motion, not wiping, to press the product into your skin.
- For a foundation brush: Use a flat-top or buffing brush. Pick up product and apply it to your face in small, circular, buffing motions, blending seamlessly into your hairline and down your neck.
- For fingers: Warm the product on your fingertips and blend it onto your skin like a moisturizer. This often gives the most natural, sheer finish.
Concealer: Your Magic Eraser
Concealer is your secret weapon for brightening under-eyes and spot-treating blemishes. You’ll need two shades potentially: one slightly lighter for under-eyes, and one that matches your skin tone for blemishes.
- For under-eyes:
- Apply a few dots of a slightly lighter, creamy concealer in an inverted triangle shape under your eyes. This not only covers darkness but also brings light to the center of your face.
- Gently blend with your ring finger (the warmth helps it melt into the skin), a small brush, or the tip of your damp beauty sponge. Pat, don’t drag.
- For blemishes/redness:
- Apply a tiny dot of skin-toned concealer directly onto the blemish or red area.
- Gently tap and blend the edges with your ring finger or a small brush until it’s seamless.
Setting Powder: Locking It All In
Setting powder helps to lock your liquid and cream products in place, reduce shine, and prevent creasing, especially under the eyes.
- How to apply:
- Dip a fluffy brush into translucent or skin-toned powder, tap off any excess.
- Lightly press and roll the brush over your T-zone (forehead, nose, chin) and under your eyes, or any areas where you tend to get oily.
- Be sparing! Too much powder can make your skin look cakey or dry. The goal is to set, not to mattify entirely unless that’s your preference.
Step 2: Adding Dimension – Bronzer, Blush, and Highlighter
Once your base is set, your face might look a little flat. This step is all about bringing back natural shadows and light to give your complexion life and warmth.
Bronzer: Sun-Kissed Warmth (Optional)
Bronzer adds warmth to your skin, mimicking a natural sun-kissed glow. Avoid anything too shimmery or orange.
- How to apply:
- Using a fluffy brush, lightly dust bronzer in a “3” shape on each side of your face: from your forehead, down to your cheekbones, and then along your jawline.
- Apply a little to the bridge of your nose and chin for a natural look.
- Blend, blend, blend! There should be no harsh lines.
Blush: The Flush of Life
Blush is your instant pick-me-up! It adds a healthy, youthful flush to your cheeks.
- Choosing your shade: Think about the color your cheeks naturally turn when you blush or get excited. Pinks, peaches, and rosy tones are universally flattering.
- How to apply:
- Smile slightly to find the apples of your cheeks.
- Using a blush brush, gently sweep the blush onto the apples of your cheeks, blending upwards towards your temples.
- Start with a small amount and build up slowly. It’s easier to add more than to take away!
Highlighter: That Inner Glow (Optional)
Highlighter catches the light and emphasizes the high points of your face, giving you a luminous, radiant glow.
- How to apply:
- Using a small, fluffy brush or your fingertip, apply a subtle sweep of highlighter to the tops of your cheekbones, just above your blush.
- You can also add a touch down the bridge of your nose and on your cupid’s bow (the dip above your upper lip) for extra oomph.
- Remember, less is more for a natural look.
Step 3: Defining Your Eyes – Brows, Eyeshadow, Liner, and Mascara
Your eyes are the windows to your soul, and defining them can dramatically enhance your entire look, even with minimal effort. This is where you can truly express your mood!
Brows: Frame Your Face
Well-groomed brows frame your face beautifully and can make a huge difference, even if you wear no other makeup.
- Products: Brow pencil, powder, or tinted brow gel. For beginners, a pencil or a tinted gel is often easiest.
- How to apply (simple technique):
- Brush your brow hairs upwards with a spoolie brush (the brush on the end of most brow pencils).
- Using short, hair-like strokes, lightly fill in any sparse areas, focusing on the tail of your brow. Don’t press too hard.
- Use the spoolie again to blend out any harsh lines and distribute the product evenly for a softer, more natural look.
- If using a tinted brow gel, simply brush it through your brows to define and set them.
Eyeshadow: A Touch of Depth (Optional)
For beginners, stick to a neutral palette and simple application. A two-shade look is perfect for everyday.
- Products: A neutral eyeshadow palette with a light all-over shade and a slightly darker crease shade.
- How to apply (beginner-friendly):
- Base/Lid Shade: Using a flat shader brush or your fingertip, apply a light, neutral eyeshadow (like a cream or light brown) all over your eyelid, from your lash line up to your crease.
- Crease Shade: Take a fluffy blending brush and pick up a slightly darker, matte brown or taupe shade. Lightly sweep this into your crease (the hollow just above your eyeball) in windshield-wiper motions. This adds definition and depth.
- Blend: Ensure there are no harsh lines between the two shades. Blend them seamlessly together.
- Optional: A tiny dab of shimmer on the center of your lid can make your eyes pop!
Eyeliner: Subtle Definition (Optional)
Eyeliner can make your lashes look thicker and define your eye shape. For beginners, a pencil or gel liner is often easier to control than liquid.
- How to apply (easy tightline/lash line):
- Gently lift your upper eyelid.
- Using a sharpened pencil liner, carefully dot or draw small dashes along your upper lash line, getting as close to the roots of your lashes as possible.
- Connect the dots/dashes to create a thin, continuous line.
- For an even softer look, you can use a small brush or a cotton swab to smudge the line slightly.
- Avoid extending too far past your outer corner initially – keep it simple!
Mascara: Open Your Eyes
Mascara is a game-changer! It instantly brightens and opens up your eyes, making you look more awake and polished.
- How to apply:
- Start at the base of your upper lashes, wiggling the wand back and forth slightly to deposit product at the roots.
- Then, pull the wand upwards through the tips of your lashes.
- Repeat 1-2 coats for desired volume and length.
- For your lower lashes, hold the wand vertically and lightly brush through them.
- Pro Tip: Don’t pump the mascara wand in and out of the tube – this pushes air in and dries out the product faster.
Step 4: Lip Service – Defining and Coloring Your Pout
The final touch for a pulled-together look! Your lips can be as bold or as subtle as you like, from a simple balm to a vibrant lipstick.
Lip Balm: The Foundation for Your Lips
Always start with hydrated lips. Apply a nourishing lip balm and let it sink in for a minute or two.
Lipstick or Lip Gloss: Your Finishing Statement
- Choosing your shade: For beginners, start with shades close to your natural lip color – mauves, nude pinks, or soft berries.
- How to apply:
- Lipstick: You can apply directly from the bullet, or for more precision, use a lip brush. Start by outlining your cupid’s bow, then fill in the rest of your lips. Blot with a tissue if needed to remove excess.
- Lip Gloss: Simply glide the applicator over your lips for a shiny, often sheer, finish.
- Optional: For longer-lasting color, you can line your lips with a lip liner that matches your lipstick before applying. This also helps prevent feathering.
Finishing Touches and Setting Your Look
You’ve done it! Now, a few final steps to ensure your masterpiece stays put and looks flawless.
- The Mirror Test: Step back and look at your makeup in natural light if possible. Check for any harsh lines, unblended areas, or unevenness. This is your chance to gently blend or correct anything.
- Setting Spray (Optional): If you want extra longevity, a setting spray can help melt all the layers of makeup together and keep it fresh for hours. Hold the bottle 8-10 inches from your face, close your eyes, and mist 2-4 times in an “X” and “T” motion.
Common Beginner Mistakes to Avoid
Learning is all about trial and error. Here are a few common pitfalls to steer clear of:
- Wrong Shade of Foundation: The most common mistake! Always test on your jawline in natural light.
- Too Much Product: Start with a tiny amount and build up. You can always add more, but it’s hard to take away!
- Not Blending Enough: Harsh lines (especially with foundation, bronzer, or eyeshadow) are a dead giveaway. Blend until everything looks seamless.
- Skipping Skincare: Your canvas makes all the difference. Don’t neglect cleansing and moisturizing.
- Over-Pumping Mascara: It introduces air and dries out your mascara faster.
- Applying Makeup in Bad Lighting: Fluorescent lights can be deceiving. Try to apply near a window with natural light.
- Fear of Experimentation: Makeup washes off! Don’t be afraid to try new things and find what works for YOU.
“Makeup is a great tool for self-expression. There are no rules, no right or wrong ways to do it. It’s about what makes you feel good.”
Practice Makes Progress: Embrace the Journey
Learning how to apply makeup for beginners step by step is a journey, not a destination. Your first attempts might not look like a celebrity’s red-carpet glam, and that’s perfectly okay! The key is to practice, experiment, and most importantly, have fun with it. What might seem complicated now will become second nature with consistency.
Don’t be afraid to try different products, watch more tutorials (now that you have a basic understanding!), and tweak techniques to suit your unique features and style. Makeup is a powerful tool for self-confidence and self-expression. It’s about enhancing your natural beauty, playing with color, and feeling great in your own skin.
So, take a deep breath, grab your brushes, and remember: you’ve got this. Every swipe, every blend, every color choice is an opportunity to celebrate yourself. Go forth and glow, gorgeous!
Frequently Asked Questions About Beginner Makeup Application
Here are some common questions from women starting their makeup journey:
Q: What’s the absolute minimum makeup I need to start with?
A: If you’re looking for the bare minimum to make a noticeable difference, focus on these three: a good moisturizer with SPF, mascara, and a tinted lip balm or sheer lipstick. Add a concealer for any areas you want to subtly cover, and you’re good to go!
Q: How do I find my perfect foundation shade without going to a store?
A: This can be tricky, but many brands offer online shade-matching tools or virtual try-on features. The best way is to know your undertone (warm, cool, or neutral) and try to match your jawline in natural light. When in doubt, opt for a slightly sheerer formula like a BB cream, as it’s more forgiving. Many online retailers also have excellent return policies if the shade isn’t quite right.
Q: How can I make my makeup last all day?
A: Longevity starts with good skin prep (cleansing, moisturizing, and primer). After applying your base, lightly set it with a translucent powder, especially in your T-zone. Finishing with a setting spray after all your makeup is applied can also significantly extend wear time and help your makeup blend seamlessly into your skin, preventing a “cakey” look.
Q: Can I skip some steps if I’m in a hurry or prefer a more natural look?
A: Absolutely! This guide provides a comprehensive overview, but makeup is entirely personal. On busy mornings, you might only do moisturizer, concealer, mascara, and a lip gloss. For a more “no-makeup” makeup look, focus on just evening out your skin tone, defining your brows, and adding a touch of color to your lips and cheeks. There are no strict rules, only guidelines.
Q: What’s the best way to clean my makeup brushes?
A: Regular brush cleaning is essential for hygiene and product application. You can use a gentle shampoo (like baby shampoo) or a dedicated brush cleanser. Wet the bristles, apply a small amount of cleanser, gently lather, and rinse under lukewarm water until the water runs clear. Reshape the bristles and lay them flat on a towel or hang them upside down to air dry. Aim to clean face brushes once a week and eye brushes every two weeks, or more frequently if you use them daily.
Recommended Resources
For more on how to apply, see How To Shop Secondhand Clothing Guide on Fashion Goggled.
Explore How To Set Healthy Boundaries With Family Members for additional insights.